Around this time of year we tend to get the itch to start de-cluttering, organising and spring cleaning our homes. Just as it is very satisfying to see clearly out of the windows and find only edible contents in the fridge, I find it even more rewarding to be putting on my freshly polished hiking boots and pack my less dusty rain jacket into my backpack with the confidence of knowing its ready for whatever the weather. Even the process of cleaning my boots is fun (once I’ve started!)- as I examine the soles, I think of all the steps trodden and miles travelled. It fills me with gratitude for adventures past and anticipation for new explorations.
Spring cleaning items however doesn’t just make you feel good, it extends the efficacy and life of your gear- especially important as outdoor gear isn’t cheap and getting more wears also means less environmental impact.
So what do you need to consider in terms of cleaning? Here is a handy guide to cleaning and caring for your outdoor gear.
N.B. Always remember to check the specific washing instructions of your item first.
Hiking boots
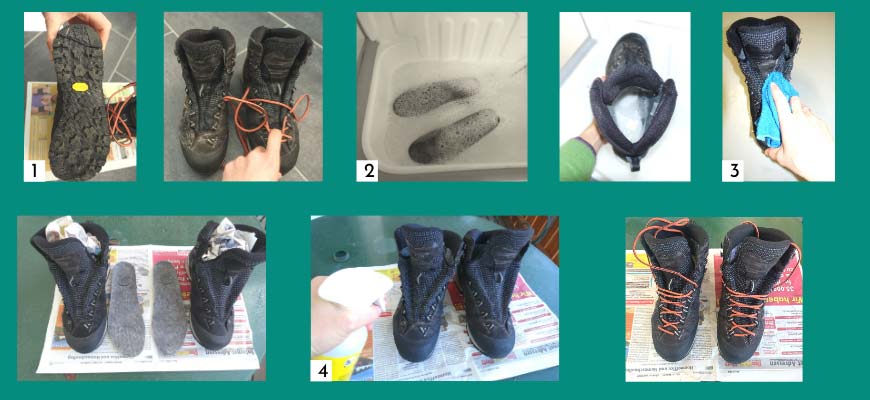
Boot care
- Inspect & remove dirt - remove any dirt or stones from the soles under flowing cold water with a pointed object. Give the profile a good once-over- checking that its still good. If its worn then most good quality boots can be re-soled by a professional cobbler. If any of the rubber sealing is looking weary then this also can be resealed by a professional. Remove the laces and wipe away any dirt in those harder to reach spots with a cloth and brush- also under a light flow of water.
- Inner shoe care - any salt and dirt such as sand also reduce the breathability of the inner shoe. Take out the sole and give the inside of the shoe a good rinse with a mild detergent. Replace worn soles with new, good quality soles. If the sole is still in good condition, then give it a wash with soap.
- Wipe & dry - wipe away any excess moisture on the shoe with a cloth. Stuff with balls of loosely scrunched newspaper and set to dry on a piece of newspaper at room temperature (not next to the heater). At this point you can put the laces in the washing machine and spray them with a waterproofing agent.
- Care - once the shoe is fully dry, its time for the waterproofing. For smooth leather boots, a nice wax massage will do the trick. Massage in circular movements into the fabric and let it sit for a few hours or overnight to seep in. Then remove any excess with a clean cloth. For any rougher leather (e.g. velour) a wax spray is a better option to avoid patchy application. For non-leather boots use a waterproofing spray instead.
- Storage - keep your shoes in a dry spot away from direct light. Avoid leaving in the cellar where they risk getting damp. Happy places for hiking boots are in a wardrobe, in their original shoe box or shoe rack.
Waterproof care (Jacket and trousers)
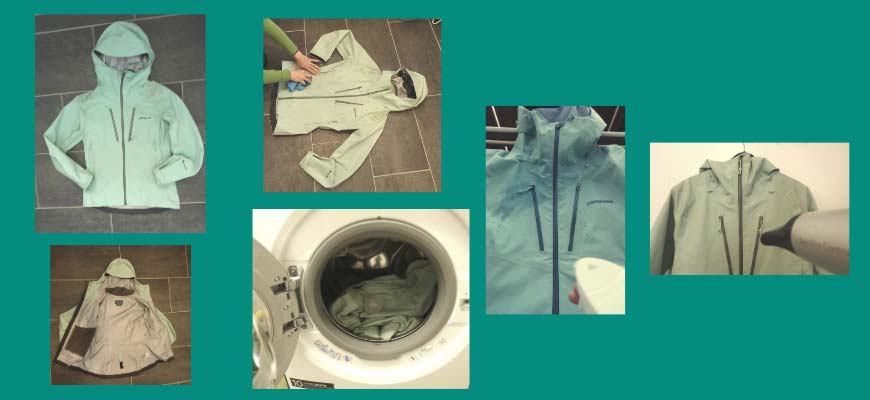
Washing and re-proofing your waterproofs
General advice with modern waterproofs is to wash more often. Dirt from the outdoors and sweat all gather in the fabric pores and hinder the breathability and efficacy of the waterproofing. If you are wearing your jacket regularly washing twice a year is recommended. I wash mine twice a year- at the end of winter and end of summer.
- Inspect – inside and outside for wear and tear. Check the seams- most good quality jackets have sealed seams. If you notice the seal is going you can either repair yourself with a seam sealant or take it to your local sports repair store to re-seal. Depending on the make or warrantee you may get the costs of this service covered. (In Germany warrantee is 2 years, so always keep your receipts for these big purchases).
If you notice any tears you can repair using a seam sealant for smaller holes and use patches (best stuck from inside) for larger holes or again take to your local sports store. - Check the zippers- if they are dirty or catching, clean with an old toothbrush and spray with silicon spray.
- Pre-clean – wipe away and patches of dirt with a soft brush or cloth dipped in warm water (don’t use any detergent or abrasive materials as these could damage the fabric tissues).
- Washing – before loading into the washing machine, its worth checking that there are no remnants of other detergents in the machine. Normal washing detergents, softeners etc can damage the waterproofing materials of the jacket which affects its ability to repel water and therefore will cause the material to absorb water- not what you want! Check your jacket for the recommended temperature setting – this is usually 30ºC. You may have an outdoor programme on your washing machine too.
- Rinse again - to ensure that all of the detergent is out, give it an extra rinse cycle.
- Dry – after washing you can throw it in the tumble dryer for a short time on a low heat to get rid of any excess moisture. Just do not let it dry out completely in the dryer as this may damage the water-proofing.
- Re-proofing – if you notice that your waterproofs are no longer keeping the moisture out (sign: water soaking in and not pearling on the material) then it is probably time to re-proof.
There are two ways for re-proofing:
- Wash-in: Complete steps 1-5 and then put in the machine in another wash cycle with re-proofing agent. Allow to hang dry. Most re-proofing agents require heat for activation, so when dry either put in the dryer for a short time on low heat or using a hair dryer on a low heat at least 20cm from the fabric, blow warm air around all areas.
- Spray-on: My preferred method, as I find it more effective. : Complete steps 1-5 and allow to dry until damp and no longer soaked. Lay out on a flat surface somewhere with good ventilation and following the instructions of the re-proofing spray, spray all over the jacket- paying particular attention that key areas such as hood, shoulders, seams and cuffs are covered. Wipe away any areas of excess proof (e.g. if it is pooling) with a clean cloth. Allow to dry. Again most re-proofing agents require heat for activation, so when dry either put in the dryer for a short time on low heat or using a hair dryer on a low heat at least 20cm from the fabric, blow warm air around all areas.
Backpack care
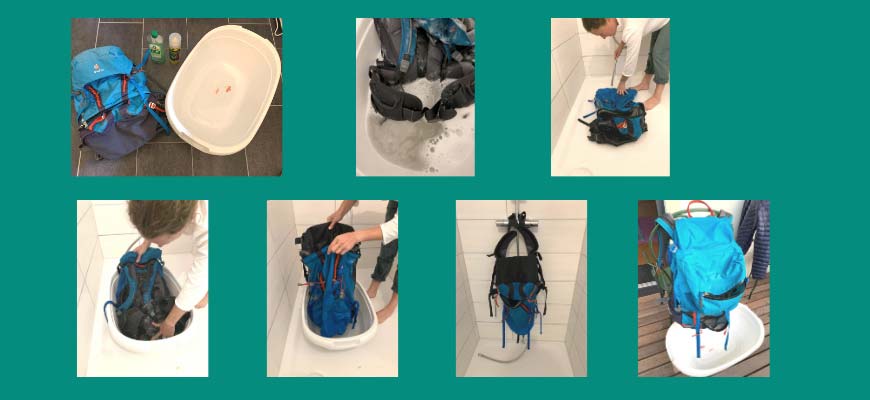
Looking after your backpack
- Inspect - from top to bottom for any tears or holes. As with waterproofs you can repair small holes with a seam sealant. Bigger holes with patches (best stuck from inside) or by your local sports store.
- Check the zippers- if they are dirty or catching, clean with an old toothbrush and spray with silicon spray.
- Shake it out - give the backpack a good shake out with all pockets open.
- Wash - inside and out, straps and all with mild detergent. Best in the bath tub or solid washing basket.
- Re-waterproof - especially the top pocket, front and side pockets with a waterproofing spray.
- Store in a cupboard, under the bed or in the cellar.
Sleeping bag
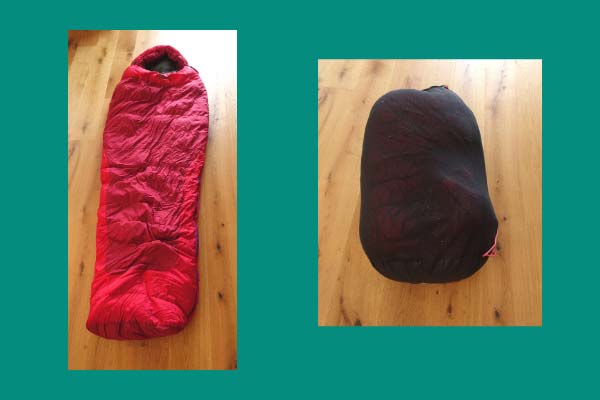
Always store your sleeping bag loose in a large cotton bag
A good airing is the number one option - leaving it outside for a few hours will generally remove any musty odours.
If it is dirty then best of all handwash as follows:
- Fill a bath tub with warm water and add in the washing bag specific (e.g. down/ synthetic) detergent. Submerge the sleeping bag in the water and wash by moving the bag in and out and around in the water. Let the dirty water out and squeeze out as much of the water as possible from the bag
- Fill the tub again with fresh water, and repeat all steps again. Repeat until water runs clear.
- Squeeze out as much water as possible.
- Hang out to dry opened on a flat washing stand.
- For down rucksacks, separate any clumps with your hands - and give the rucksack a shake every few hours, again separating any clumps – be patient, it may take several days to dry completely.
- Always store loose in a large cotton bag in a dry spot until you next need it.
Trekking poles
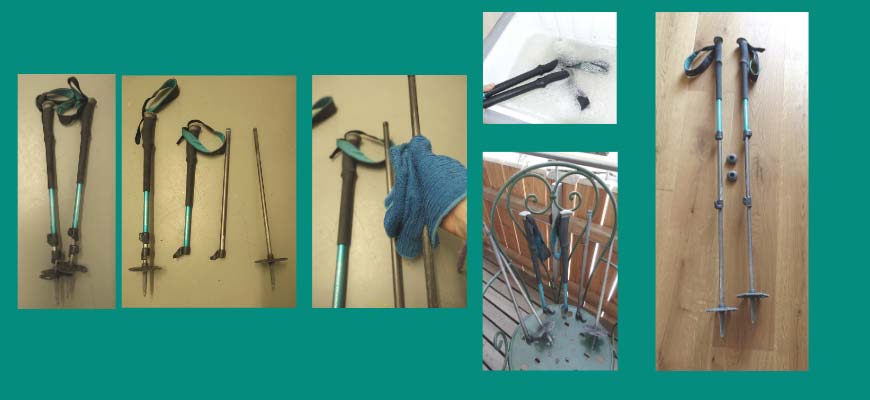
Looking after your trekking poles
- Separate all parts, wipe with a mild detergent and dry. Reassemble
- Check and tighten any of the adjustment screws. Never oil the fittings!
N.B. At the start of summer and winter hiking season is also time to switch over the baskets.
Water bottles
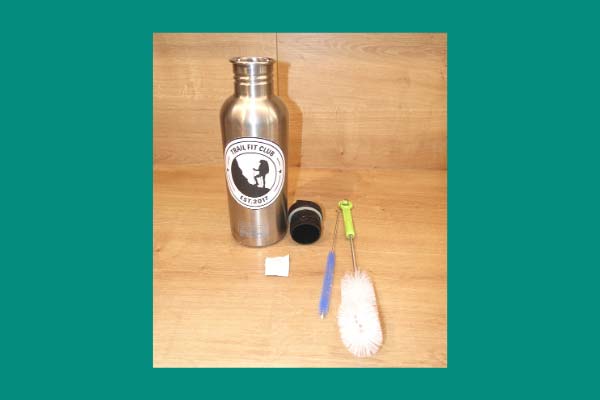
To give your water bottle a thorough clean, you will need a bottle brush, denture cleaner or baby bottle sterilizing tablets.
Even if you are only putting water in your bottle, you may find a light film on the inside after a while. A top tip for getting rid of this and purifying it is with denture cleaner or baby bottle sterilzing tablets. If the neck of the bottle is very tight, get a bottle brush from a general household store. Always store the lid unscrewed to allow air to flow in.
Hydration systems
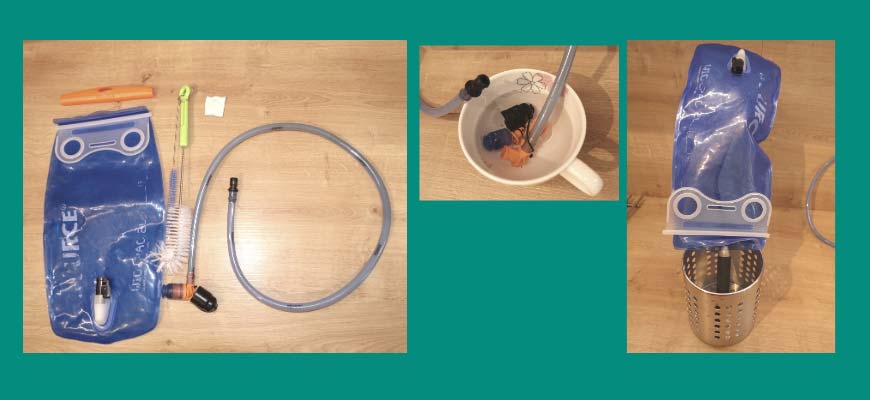
Disconnect all the sections of the hydration pack and mouthpiece, according to system instructions.
Our favourite types of hydration packs can be opened up easily to clean effectively:
- Wipe inside first of all with a cloth, washing up liquid and warm water.
- Rinse with cold water and leave to dry- a fish spatula.
- You can clean the tube with a pipe cleaning brush. Separate the mouthpiece parts and soak in a cup of sterilizer (baby bottle or denture cleaner).
- Once all parts are clean and dry, piece back together and you are set for fresh water breaks again!


